In production environments, storage such as NAS and SAN are most common, but for test and development scenarios, we can also use the local disk on the server to create iSCSI virtual disks, facilitating low-cost lab and test environments.
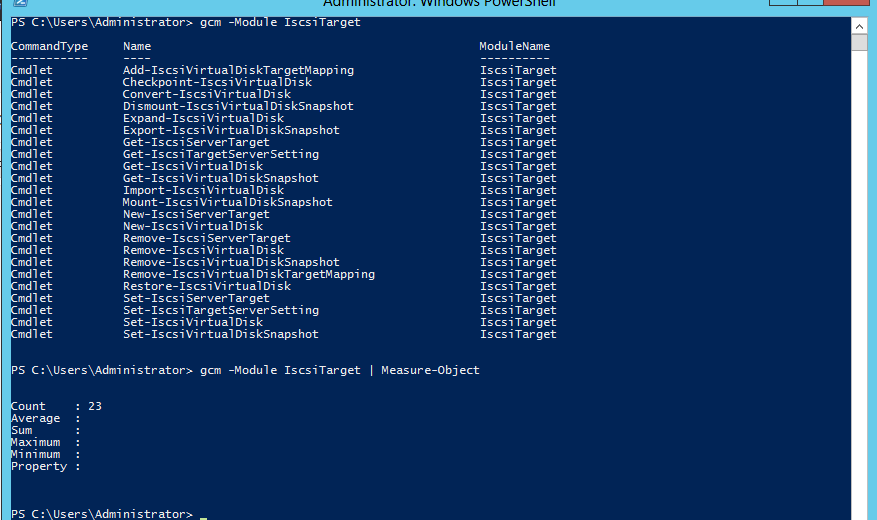
Windows Server 2012 consists of a PowerShell Module called as IscsiTarget which helps us in implementing this role.
I was just going through the cmdlets available to us with this module and i was happy to see we have a good number of them bundled with this module to automate entire manual tasks.

iSCSI Target Server module is loaded by default in Windows Server 2012. However, the cmdlets cannot be run successfully without the iSCSI Target Server role service installed.
To install it, run:
Add-WindowsFeature FS-iSCSTarget-Server
Now i will show you some basic cmdlets which could be used to convert a Windows Server 2012 Box to an iSCSI Target Server. For test purposes i will create a 1GB virtual disk and map it to iSCSITargetServer and later when other hosts connect to the iSCSITargetServer they would be able to see the 1GB LUN listed in their disk topology, which they ca further use for their requirements.
1) Check Status of iSCSI Service – We should make sure that the iSCSI service is in running state and we should set up its startup type to automatic, if its not none of our cmdlets would work to configure storage.
PS C:Windowssystem32> start-service msiscsi
PS C:Windowssystem32> Set-Service msiscsi –StartupType “Automatic”
2) Create a New LUN – I used New-iSCSIVirtualDisk cmdlet to create a new LUN, we need to enter a default path where the LUN would get created and also mention its Size, we would be creating a fixed disk.
PS C:Windowssystem32> New-IscsiVirtualDisk c:test2.vhd –size 1GB

If the VHD file path exists, then the server will return an error.
We can then use Import-IscsiVirtualDisk cmdlet to import existing VHDs.
PS C:Windowssystem32> Import-IscsiVirtualDisk c:test3.vhd
Now i can get a list of all imported/newly created iscsi virtual disks using Get-IscsiVirtualDisk cmdlet.
PS C:Windowssystem32> Get-IscsiVirtualDisk

3) Creates a new iSCSI Target object – Next i used New-IscsiServerTarget cmdlet to create a new iscsitarget object.
The New-IscsiServerTarget cmdlet creates a new iSCSI Target object with the specified name. After creating a new iSCSI Target object, the target can be assigned to an iSCSI initiator, and a virtual disk can be associated with the target.
PS C:Windowssystem32> New-IscsiServerTarget PowerShellEnth -InitiatorIds "IQN: iqn.1991-05.com.microsoft:win-o82rkg17hnb.powershell-enthusiast.com"

Here we do not need to do some powershell magic to generate the ginormous initiatorid IQN, we can get it simple by running iscsicli from a powershell prompt :).

Now i can also list out all the iscsiserver targets available on my server using
Get-IscsiServerTarget cmdlet.
The Get-IscsiServerTarget cmdlet obtains iSCSI targets and their associated properties from the local server or specified computer.

4) Assign a virtual disk to an iSCSI target -We can use Add-iscsiVirtualDiskTargetMapping cmdlet to map virtual disk’s to an iscsi target.
The Add-IscsiVirtualDiskTargetMapping cmdlet assigns a virtual disk to an iSCSI target. Once a virtual disk has been assigned to a target, and after the iSCSi initiator connects to that target, the iSCSI initiator can access the virtual disk. All of the virtual disks assigned to the same iSCSI target will be accessible by the connected iSCSI initiator.
PS C:Windowssystem32> Add-IscsiVirtualDiskTargetMapping PowerShellEnth c:test3.vhd

5) Configure iSCSI initiator to Logon to target – Next we need to configure iscsi initiator on the client server to Logon on the created target in the server.
I would have illustrated the steps which we need to perform on client server to access the iSCSI LUN’s in a different blog http://virtualize-automate.com/wp/index.php/2012/11/29/new-iscsi-cmdlets-in-powershell-v3-par/
The steps which need to be followed from this blog start from.
1) Check Status of iSCSI Service – …
Now in order to remove all the configurations which we have made we can easily achieve them with a few cmdlets.
If i pipe output of Get-IscsiServerTarget to Remove-IscsiServerTarget it would remove/delete all iSCSItargets available on a server.
PS C:Windowssystem32> Get-IscsiServerTarget | Remove-IscsiServerTarget
If i pipe output of Get-IscsiVirtualDisk to Remove-IscsiVirtualDisk it would remove all iSCSI Virtual Disk objects. The virtual hard disk (VHD) file is not deleted.
PS C:Windowssystem32> Get-IscsiVirtualDisk | Remove-IscsiVirtualDisk
If i use Remove-IscsiVirtualDiskTargetMapping cmdlet it would removes the assignment between a virtual disk and an iSCSI target.The virtual disk will no longer be accessible by an iSCSI initiator once the assignment is removed.
PS C:Windowssystem32> Remove-IscsiVirtualDiskTargetMapping -TargetName "PowerShellEnth" –Path "c:test3.vhd"
“So now i guess you should have understood how easy is with powershell and windows server 2012 to create and assign low cost storage to client servers for test and development environment without using any additional third party vendor software for emulation”