Auto Deploy Virtual Domain Controller
Hey, Guys! – PowerCli is awesome!!, and its really great when you find that it can integrate with your Microsoft infrastructure to deploy stuff!!, without any manual intervention, a fully automated solution.
I deployed a couple of cool ” most necessary ” infrastructure VM’s via powercli and powershell, this is a series of my blogposts on deploying them and i thought it would benefit you too in your environment 🙂

Here’s one of the script i wrote to Auto Deploy Virtual Domain Controller. We would be taking a use case of a windows 2008r2 domain controller as it needs some manual work for dcpromo etc as compared to win2k12 which now comes with cmdlets to perform those activities.
The entire script to automate this activity is pasted below and i have broken down this into sections to explain the script execution
Step 1) Provide the necessary parameters to the script, as you can see i provide here the sitename, the vcenter server username, the vcenter password, domain username (which would be used to join the domain controller as an additional dc in an existing domain), domain password, the local username and password which would be used to invoke unattended dcpromo, the vcenter server ip address, ip address of the virtual machine and the datastore for this virtual machine.
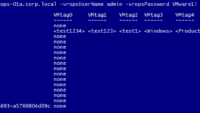
param(
$sitename,
$VCUserName,
$VCPassword,
$DomainUserName,
$DomainPassword,
$LocalUserNamePreDCPROMO,
$LocalUserPasswordPreDCPROMO,
$vcenterserver,
$datastore,
$ip
)
Once we have all the parameters ready we would add the powershell snapin for powercli to perform various vm management activities which includes vm creation and assigning the network, we would be also creating the credential objects for domain, localadmin and also the vcenter login.
Add-pssnapin VMware.VimAutomation.Core
Write-Host "Importing VMware PSSnapin..." -ForegroundColor green -BackgroundColor black

Write-Host "Acquiring Vcenter credentials..." -ForegroundColor green -BackgroundColor black
$secpasswd = ConvertTo-SecureString $VCPassword -AsPlainText -Force
$vccredential = New-Object System.Management.Automation.PSCredential ($VCUserName, $secpasswd)

Write-Host "Acquiring Credentials for  Domain..." -ForegroundColor green -BackgroundColor black
$secpasswd = ConvertTo-SecureString $DomainPassword -AsPlainText -Force
$gCredential = New-Object System.Management.Automation.PSCredential ($DomainUserName, $secpasswd)

Write-Host "Acquiring Credentials Local UserName for DCPROMO..." -ForegroundColor green -BackgroundColor black
$secpasswd = ConvertTo-SecureString $LocalUserPasswordPreDCPROMO -AsPlainText -Force
$LACredential = New-Object System.Management.Automation.PSCredential ($LocalUserNamePreDCPROMO, $secpasswd)
Next we would make sure that there are no Non-Persistent OS customizations present on the vcenter, OS customizations are required to apply a certain customization to a VM while deployment or after deployment, the OS customization can apply an ip configuration settings to the VM, join it to a domain etc.., so yes you guessed it right –> No extra code for all these activities.
Get-OSCustomizationSpec -Type NonPersistent | Remove-OSCustomizationSpec -Confirm:$false
Next lets create the VM name, for this i would be using the substring() operator to trim out the first three characters from the sitename parameter passed to the script and create the $VMname variable, also i would change the window title to indicate the status that we are deploying a DC with $VMname
$sitename = $sitename.ToUpper()

$VMname = $sitename.substring(0,3)+"DC01"
$host.ui.rawui.windowtitle = "Deploying Domain Controller $vmname"

Next comes the real fun part of customizing the VM as per requirements, here we would be assigning the IP details, in this script we assume that the DNS,Subnet Mask and Gateway are common so we hard-coded them in the script. For this environment we are using an existing OS customization spec for windows2008r2 vm and we create a new OS-Custom-Spec based on this and name it as “DCSpec”
# Clone our Spec adding the ip address for the VM.
$Spec = Get-OSCustomizationSpec 'Win2k8-VM' | New-OSCustomizationSpec -Name 'DCSpec' -Type NonPersistent

# Update Spec with the new VLANs IP information

$Spec = Get-OSCustomizationNicMapping -Spec $Spec |
Set-OSCustomizationNicMapping -IPmode UseStaticIP `
-IpAddress $IP`
-SubnetMask '215.222.252.0' `
-DefaultGateway '10.138.171.123' `
-Dns '10.218.17.61'


$Spec = Get-OSCustomizationSpec 'DCSpec'
Once we create a nonpersistent os customization spec based, next comes the fun part – creating a vm by using this OS customization spec. As you can see below in the script i clone a vm from a template, apply the non persistent os customization spec and i place it on a VMware cluster by selecting a random host. Also note that this task is executed asynchronously, Next to monitor the VM provisioning process i use the “Wait-Task” cmdlet to wait for the clone task to get completed, this would give me a nice progress bar to view the status of deployment, next we would assign the virtual machine network to the virtual machine and wait for the virtual machine to be powered on.
# Create the VM with the new custom os spec

$clonetask = New-VM -template Win2k8R2-Template -OSCustomizationSpec $Spec -vmhost (Get-Cluster "vcluster" | Get-VMHost | Get-Random) -name $VMname -runasync -datastore $datastore

# A nice progress bar to view the current status of deployment

Get-Task -Id $clonetask.ID | Wait-Task

start-vm $vmname | wait-tools

Start-Sleep 5

# Connect and assign network name
Get-VM $VMname | Get-NetworkAdapter | Set-NetworkAdapter -Connected:$true -StartConnected:$true -NetworkName "VM Network" -Confirm:$false

##### Wait for the VM to be powered on #####

$VM = Get-VM -Name $vmname

While ($vm.ExtensionData.Runtime.PowerState -ne 'poweredOn')
{
Start-Sleep -Seconds 1
$vm.ExtensionData.UpdateViewData('Runtime.PowerState')
}
Next we would wait for the OS customization activity to start and complete for this VM, and viola 🙂 you would have a fully custom vm deployed , assigned its ip, joined to a domain all within maximum 5 minutes !!
There is an awesome blogpost by the powercli team who authored this script, i tinkered around a bit and converted it to a function 🙂
#Tracking deployment progress

function WaitVM-Customization {

[CmdletBinding()]
param(
# VMs to monitor for OS customization completion
[Parameter(Mandatory=$true)]
[ValidateNotNullOrEmpty()]
[VMware.VimAutomation.ViCore.Types.V1.Inventory.VirtualMachine[]] $vm,

# timeout in seconds to wait
[int] $timeoutSeconds = 600
)

<#

.SYNOPSIS
Waits customization process for list virtual machines to completes.

.DESCRIPTION
Waits customization process for list virtual machines to completes.
The script returns if customization process ends for all virtual machines or if the specified timeout elapses.
The script returns PSObject for each specified VM.
The output object has VM and CustomizationStatus properties.


.NOTES
The script is based on sveral vCenter events.
* VmStarting event - this event is posted on power on operation
* CustomizationStartedEvent event - this event is posted for VM when customiztion has started
* CustomizationSucceeded event - this event is posted for VM when customization has successfully completed
* CustomizationFailed - this event is posted for VM when customization has failed

Possible CustomizationStatus values are:
* "VmNotStarted" - if it was not found VmStarting event for specific VM.
* "CustomizationNotStarted" - if it was not found CustomizationStarterdEvent for specific VM.
* "CustomizationStarted" - CustomizationStartedEvent was found, but Succeeded or Failed event were not found
* "CustomizationSucceeded" - CustomizationSucceeded event was found for this VM
* "CustomizationFailed" - CustomizationFailed event wass found for this VM

#>

# constants for status
$STATUS_VM_NOT_STARTED = "VmNotStarted"
$STATUS_CUSTOMIZATION_NOT_STARTED = "CustomizationNotStarted"
$STATUS_STARTED = "CustomizationStarted"
$STATUS_SUCCEEDED = "CustomizationSucceeded"
$STATUS_FAILED = "CustomizationFailed"

$STATUS_NOT_COMPLETED_LIST = @( $STATUS_CUSTOMIZATION_NOT_STARTED, $STATUS_STARTED )

# constants for event types
$EVENT_TYPE_CUSTOMIZATION_STARTED = "VMware.Vim.CustomizationStartedEvent"
$EVENT_TYPE_CUSTOMIZATION_SUCCEEDED = "VMware.Vim.CustomizationSucceeded"
$EVENT_TYPE_CUSTOMIZATION_FAILED = "VMware.Vim.CustomizationFailed"
$EVENT_TYPE_VM_START = "VMware.Vim.VmStartingEvent"

# seconds to sleep before next loop iteration
$WAIT_INTERVAL_SECONDS = 15

function main($vm, $timeoutSeconds) {
# the moment in which the script has started
# the maximum time to wait is measured from this moment
$startTime = Get-Date

# we will check for "start vm" events 5 minutes before current moment
$startTimeEventFilter = $startTime.AddMinutes(-5)

# initializing list of helper objects
# each object holds VM, customization status and the last VmStarting event
$vmDescriptors = New-Object System.Collections.ArrayList
foreach($vm in $vm) {
Write-Host "Start monitoring customization process for vm '$vm'"
$obj = "" | select VM,CustomizationStatus,StartVMEvent
$obj.VM = $vm
# getting all events for the $vm,
# filter them by type,
# sort them by CreatedTime,
# get the last one
$obj.StartVMEvent = Get-VIEvent -Entity $vm -Start $startTimeEventFilter | `
where { $_ -is $EVENT_TYPE_VM_START } |
Sort CreatedTime |
Select -Last 1

if (-not $obj.StartVMEvent) {
$obj.CustomizationStatus = $STATUS_VM_NOT_STARTED
} else {
$obj.CustomizationStatus = $STATUS_CUSTOMIZATION_NOT_STARTED
}

[void]($vmDescriptors.Add($obj))
}

# declaring script block which will evaulate whether
# to continue waiting for customization status update
$shouldContinue = {
# is there more virtual machines to wait for customization status update
# we should wait for VMs with status $STATUS_STARTED or $STATUS_CUSTOMIZATION_NOT_STARTED
$notCompletedVms = $vmDescriptors | `
where { $STATUS_NOT_COMPLETED_LIST -contains $_.CustomizationStatus }

# evaulating the time that has elapsed since the script is running
$currentTime = Get-Date
$timeElapsed = $currentTime - $startTime

$timoutNotElapsed = ($timeElapsed.TotalSeconds -lt $timeoutSeconds)

# returns $true if there are more virtual machines to monitor
# and the timeout is not elapsed
return ( ($notCompletedVms -ne $null) -and ($timoutNotElapsed) )
}

while (& $shouldContinue) {
foreach ($vmItem in $vmDescriptors) {
$vmName = $vmItem.VM.Name
switch ($vmItem.CustomizationStatus) {
$STATUS_CUSTOMIZATION_NOT_STARTED {
# we should check for customization started event
$vmEvents = Get-VIEvent -Entity $vmItem.VM -Start $vmItem.StartVMEvent.CreatedTime
$startEvent = $vmEvents | where { $_ -is $EVENT_TYPE_CUSTOMIZATION_STARTED }
if ($startEvent) {
$vmItem.CustomizationStatus = $STATUS_STARTED
Write-Host "VI Event Generated - Customization for VM '$vmName' has started" -ForegroundColor Yellow -BackgroundColor Black
}
break;
}
$STATUS_STARTED {
# we should check for customization succeeded or failed event
$vmEvents = Get-VIEvent -Entity $vmItem.VM -Start $vmItem.StartVMEvent.CreatedTime
$succeedEvent = $vmEvents | where { $_ -is $EVENT_TYPE_CUSTOMIZATION_SUCCEEDED }
$failedEvent = $vmEvents | where { $_ -is $EVENT_TYPE_CUSTOMIZATION_FAILED }
if ($succeedEvent) {
$vmItem.CustomizationStatus = $STATUS_SUCCEEDED
Write-Host "VI Event Generated - Customization for VM '$vmName' has successfully completed" -ForegroundColor Green -BackgroundColor Black
}
if ($failedEvent) {
$vmItem.CustomizationStatus = $STATUS_FAILED
Write-Host "Customization for VM '$vmName' has failed"
}
break;
}
default {
# in all other cases there is nothing to do
# $STATUS_VM_NOT_STARTED -> if VM is not started, there's no point to look for customization events
# $STATUS_SUCCEEDED -> customization is already succeeded
# $STATUS_FAILED -> customization
break;
}
} # enf of switch
} # end of the freach loop

Write-Host "Awaiting OS Customization VI Event, Sleeping for $WAIT_INTERVAL_SECONDS seconds" -BackgroundColor Black

Sleep $WAIT_INTERVAL_SECONDS
} # end of while loop

# preparing result, without the helper column StartVMEvent
$result = $vmDescriptors | select VM,CustomizationStatus
return $result
}

main $vm $timeoutSeconds

}

WaitVM-Customization -vm $vm
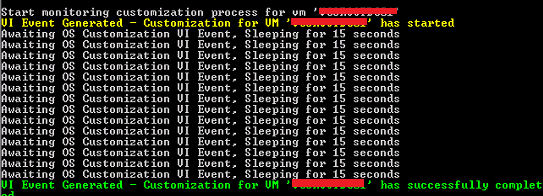
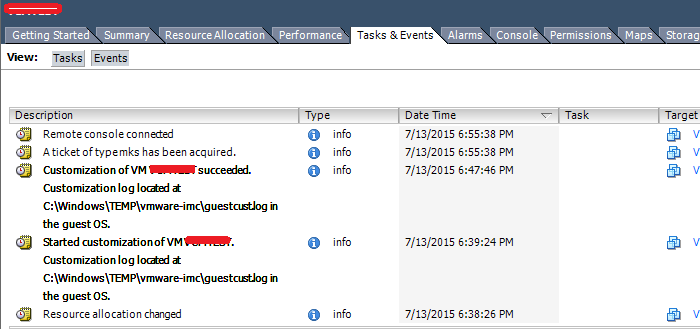
You can also monitor this in the events tab for the VM
Next lets wait for the VMtools to be running on the VM, just to make sure that the VM completes its boot up after the oscustomization process 🙂
Get-VM $VMname | Wait-Tools
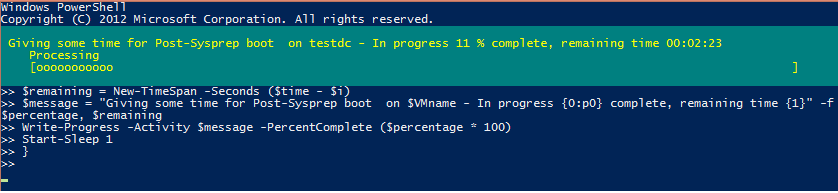
Some times the boot from post sysprep process for windows is a bit unpredictable so if you want you can also give a wait for about 3 minutes ;), just to make sure that everything comes up correct.
$time = 160 # seconds, use you actual time in here
foreach($i in (1..$time)) {
$percentage = $i / $time
$remaining = New-TimeSpan -Seconds ($time - $i)
$message = "Giving some time for Post-Sysprep boot  on $VMname - In progress {0:p0} complete, remaining time {1}" -f $percentage, $remaining
Write-Progress -Activity $message -PercentComplete ($percentage * 100)
Start-Sleep 1
}

Write-Progress -Activity $message -Completed -Id 1
Next we would remove th non persistent OS customization, just to make sure that our environment remains clean.
Get-OSCustomizationSpec 'DCSpec' | Remove-OSCustomizationSpec -Confirm:$false
For the current deployment we would be creating two drives P:\ ( For PageFile ) and D:\ ( To Place the NTDS and SYSLOG files )
#Creating additional harddisk and formatting and assign drive letter

New-HardDisk -VM $VMname -CapacityGB 40 -StorageFormat Thick

Start-Sleep 5
Now comes the real power of powercli, “Invoke-VMScript”, this is an extraordinary cmdlet which allows you to execute scripts inside the VM guest using vmware tools, so no need for network connection to a VM, you can be 100% sure even if there is no network connectivity to the VM, the scripts will still execute, this cmdlet can be used for situations where in you cannot enable or use native powershell remoting to execute scripts or cmdlets on remote machines. In the below Invoke-VMscript activity i am using the diskpart utility to format and make the disk online and also changing the CDROM drive letter to Z:\ and assigning the drive letter D:\ to it.
Invoke-VMScript -ScriptText {

"select disk 1","online disk noerr","attributes disk clear readonly noerr","create partition primary noerr", "format quick" | diskpart

} -VM $vmname -GuestCredential $LACredential

Invoke-VMScript -ScriptText {
$cd = Get-WMIObject -Class Win32_CDROMDrive -ErrorAction Stop
$OldDriveLetter = $cd.drive
$cdvolume = Get-WmiObject -Class Win32_Volume -Filter "DriveLetter='$oldDriveLetter'" -ErrorAction Stop
Set-WmiInstance -InputObject $cdvolume -Arguments @{DriveLetter="Z:"} -ErrorAction Stop | Out-Null

$drive = gwmi Win32_Volume | where {$_.freespace -eq "42852179968"}
$drive.DriveLetter = "D:"
$drive.Put()
} -VM $vmname -GuestCredential $LACredential
Similarly we would perform this activity for P:\ drive ( For Page File ), also perform the page file configuration for the VM.
### Creating drive letter for P:\ (Logs) ###

New-HardDisk -VM $VMname -CapacityGB 15 -StorageFormat Thick

Start-Sleep 5

Invoke-VMScript -ScriptText {
"select disk 2","online disk noerr","attributes disk clear readonly noerr","create partition primary noerr", "format quick" | diskpart
} -VM $vmname -GuestCredential $LACredential

Start-Sleep 5

Invoke-VMScript -ScriptText {

$drive = gwmi Win32_Volume | where {$_.freespace -eq "16009453568"}
$drive.DriveLetter = "P:"
$drive.Put()
} -VM $vmname -GuestCredential $LACredential

# Changing Page file drive to P:\ and also set the pagefile setting to 12GB
Invoke-VMScript -ScriptText {

$computer = Get-WmiObject Win32_computersystem -EnableAllPrivileges
$computer.AutomaticManagedPagefile = $false
$computer.Put()
$CurrentPageFile = Get-WmiObject -Query "select * from Win32_PageFileSetting where name='c:\\pagefile.sys'"
$CurrentPageFile.delete()
Set-WMIInstance -Class Win32_PageFileSetting -Arguments @{name="P:\pagefile.sys";InitialSize = 12288; MaximumSize = 12288}

} -VM $VMname -GuestCredential $LACredential
So you guys just saw how cool and awesome the cmdlet “Invoke-VMscript” is !!, the possibilities are endless and all depends on your creativity.
Next lets create a new site in ADDS, this site would be used in our DCPROMO unattended installation, as you can see there are three steps to this,
1) ############## Creating New Site with subnet details #########
<#

$content = @( 'Set-ExecutionPolicy RemoteSigned -Force' 'ipmo activedirectory' "New-ADObject -Name '$sitename' -Type Site -Path 'CN=Sites,CN=Configuration,DC=domain,DC=lab'"

"New-ADObject -Name 'NTDS Site Settings' -Type NTDSSiteSettings -Path 'CN=$sitename,CN=Sites,CN=Configuration,DC=domain,DC=lab'"

"New-ADObject -Name 'Servers' -Type serversContainer -Path 'CN=$sitename,CN=Sites,CN=Configuration,DC=domain,DC=lab'"

"New-ADObject -Name '$subnet' -Type Subnet -Path 'CN=Subnets,CN=Sites,CN=Configuration,DC=domain,DC=lab' -OtherAttributes @{siteObject='CN=$sitename,CN=Sites,CN=Configuration,DC=domain,DC=lab'; location='$sitename'}"


) $content | out-file C:\dcpromotxt\sitecreation.ps1
2) Next copy over the sitecreation.ps1 file created to an existing domain controller, as you can see we use the Copy-VMGuestFile cmdlet and it also uses vmware tools internally to copy over content without the use of network resources
Copy-VMGuestFile -Source "C:\dcpromotxt\sitecreation.ps1" -Destination "C:\users\administrator\desktop" -VM $rootDC -LocalToGuest -GuestCredential $gcredential
3) Invoke the script to create a new site inside the domain controller, you can also see that i remove the script from the domain controller once the execution finishes
####### Configure Site in RootDC

Invoke-VMScript -ScriptText {

Invoke-Expression -Command "C:\users\administrator\desktop\sitecreation.ps1"


} -VM $rootDC -GuestCredential $gCredential


Invoke-VMScript -ScriptText {

Remove-Item "C:\users\administrator\desktop\sitecreation.ps1" -Force

} -VM $rootDC -GuestCredential $gCredential -ErrorAction SilentlyContinue

start-sleep 60
Next lets get onto the final step, which is to create the unattended file for DCPROMO, copy it to our additional domain controller and finally invoke the script inside the VM, now you can sit back and relax!.
The DCPROMO would get initiated inside the VM and you would have a new DC provisioned, all automated !! 🙂
Now just imagine, if you want to deploy over 100 additional DC’s :), create a CSV file with those details and pipe it to the script and use a For-EachObject 🙂 cool right!
########### Create the DC promo File and copy the unattended txt ##########
$content = @( "[DCInstall]"
"ReplicaOrNewDomain=Replica"
"ReplicaDomainDNSName=domain.lab"
"SiteName=$sitename"
"InstallDNS=Yes"
"ConfirmGc=Yes"
"CreateDNSDelegation=No"
"UserDomain=domain.lab"
"UserName=domain.lab\administrator"
'Password="VMware1!"'
'DatabasePath="D:\NTDS"'
'LogPath="D:\NTDS"'
'SYSVOLPath="D:\SYSVOL"'
'SafeModeAdminPassword="%^%81$&^!@^^VMware1!"'
"CriticalReplicationOnly=Yes"
"RebootOnCompletion=Yes" ) $content | out-file C:\dcpromotxt\newdc.txt

Copy-VMGuestFile -Source "C:\dcpromotxt\newdc.txt" -Destination "C:\opt" -VM $vmname -LocalToGuest -GuestCredential $LACredential

start-sleep 5


Invoke-VMScript -ScriptText {

dcpromo.exe /unattend:C:\opt\newdc.txt

} -VM $VMname -GuestCredential $LACredential -ErrorAction SilentlyContinue
I hope you enjoyed this blogpost on “Auto Deploy Virtual Domain Controller” and found this information useful 🙂