VMware NSX Controller Cluster creation with PowerShell
VMware NSX Controller Cluster creation with PowerShell – In this blog post we would explore how to create a controller cluster using GUI and also ways to automate it using the Invoke-WebRequest cmdlet.
First and foremost you need to have the NSX appliance registered with your vcenter server, on more details on how to go about this, refer to one of my previous blog post.
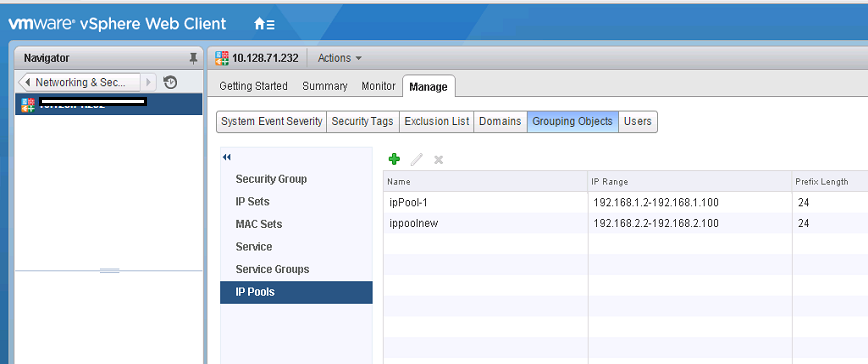
Once you have the vcenter server registered, head over to the “Networking and security” plugin, under the installation tab, click on the nsx manager and create IP Pools.
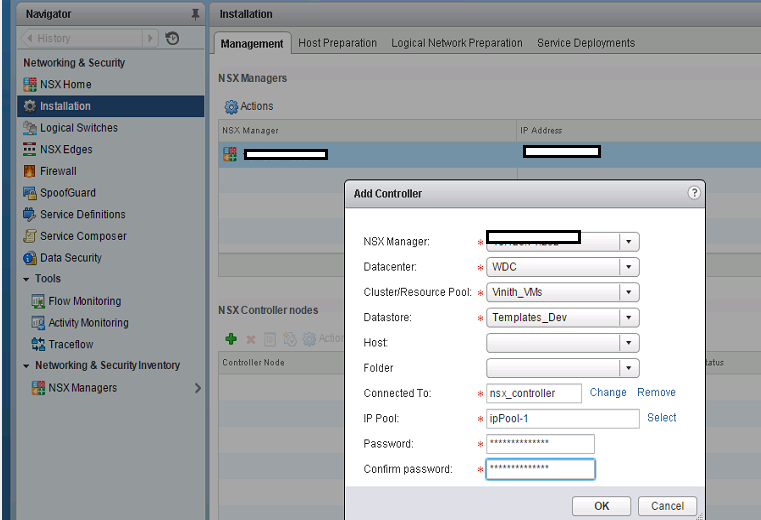
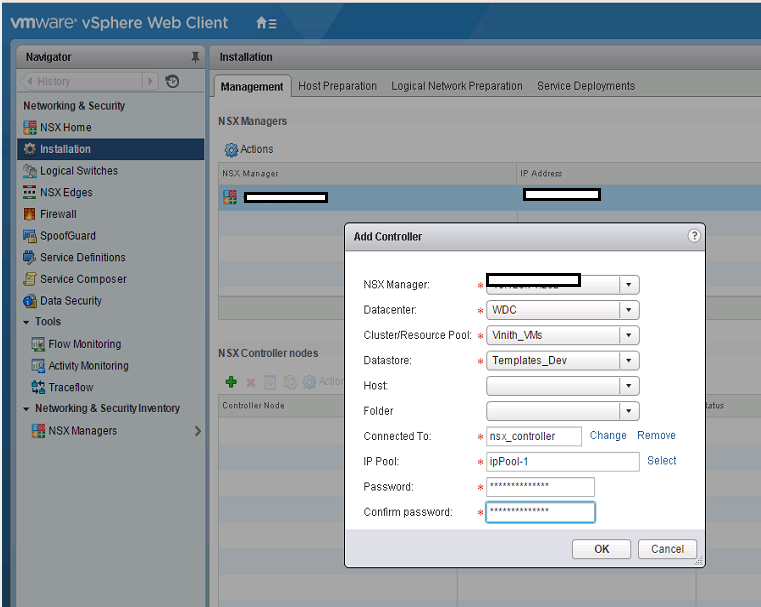
Once you have the IP pools created, click on the “+” sign to add controller nodes and feed in the required parameters
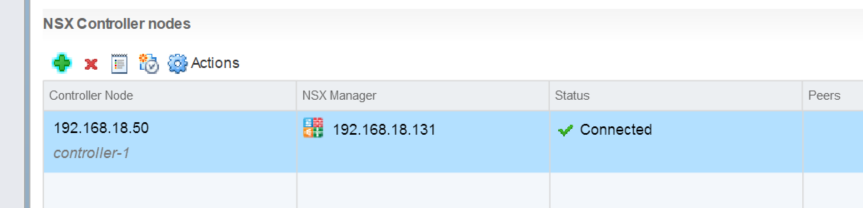
Thats it, you have created your first controller node, now as per nsx standards you need to have a 3 node controller node cluster, this also helps ins preventing a split brain scenario, follow the above steps and create the remaining too.
It painful isnt it ?? manually creating the nodes ? here’s where the magic of automation using powershell and nsx apis comes into our help.
As you don’t have any controller nodes in your nsx environment, you would need to query the ippool id, as that is a mandatory property for the API invoke,
If you look closely at the API guide for NSX, you would be able to see the below GET request can be used to get these details
https://<NSX Controller IP>/api/2.0/services/ipam/pools/scope/globalroot-0
Next lets use the Invoke-WebRequest cmdlet to invoke the API call and extract the IP Pools.
$Username = "admin"
$Password = "vmware1!"
### Ignore TLS/SSL errors

add-type @"
    using System.Net;
    using System.Security.Cryptography.X509Certificates;
    public class TrustAllCertsPolicy : ICertificatePolicy {
        public bool CheckValidationResult(
            ServicePoint srvPoint, X509Certificate certificate,
            WebRequest request, int certificateProblem) {
            return true;
        }
    }
"@
[System.Net.ServicePointManager]::CertificatePolicy = New-Object TrustAllCertsPolicy

### Create authorization string and store in $head
$auth = [System.Convert]::ToBase64String([System.Text.Encoding]::UTF8.GetBytes($Username + ":" + $Password))
$head = @{"Authorization"="Basic $auth"}


########## Query an IP Pool

$Request = "https://<Your NSX Controller IP Here>/api/2.0/services/ipam/pools/scope/globalroot-0"

try {
        $result = Invoke-WebRequest -Uri $Request -Headers $head -ContentType "application/xml" -ErrorAction:Stop
}
catch {
       $result = $_.Exception.Response.GetResponseStream()
        $reader = New-Object System.IO.StreamReader($result)
        $responseBody = $reader.ReadToEnd();
 }

# To Catch the error description, if any
$responseBody


[xml]$rxml = $result.Content

$rxml.ipamAddressPools.ipamAddressPool | ft -AutoSize -Wrap
The output of the above script-block would give you the ip pool id’s

Wow, now this is great!, some cool stuff you can achieve if you integrate powershell.
Next lets create the API request for creating a new controller, again if you look into the API guide you would see an example on how to Add a controller.
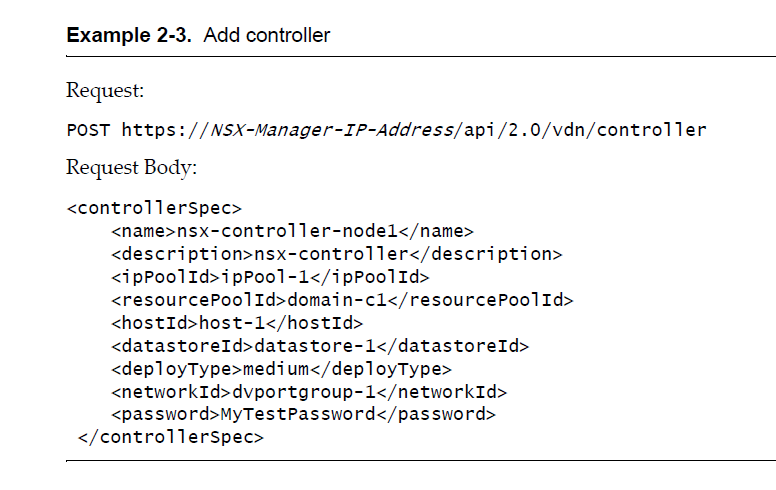
Ok, so now lets make the body tag similar to the one we have above and use Invoke-WebRequest cmdlet to create the controller.
$Username = "admin"
$Password = "vmware1!"
### Ignore TLS/SSL errors

add-type @"
    using System.Net;
    using System.Security.Cryptography.X509Certificates;
    public class TrustAllCertsPolicy : ICertificatePolicy {
        public bool CheckValidationResult(
            ServicePoint srvPoint, X509Certificate certificate,
            WebRequest request, int certificateProblem) {
            return true;
        }
    }
"@
[System.Net.ServicePointManager]::CertificatePolicy = New-Object TrustAllCertsPolicy

### Create authorization string and store in $head
$auth = [System.Convert]::ToBase64String([System.Text.Encoding]::UTF8.GetBytes($Username + ":" + $Password))
$head = @{"Authorization"="Basic $auth"}


############ Creating NSX Controller Cluster ##########

$Request = "https://<Your NSX Controller IP>/api/2.0/vdn/controller"

$body = "<controllerSpec>
 <name>nsx-controller-node1</name>
 <description>nsx-controller</description>
 <ipPoolId>ipaddresspool-2</ipPoolId>
 <resourcePoolId>resgroup-2871</resourcePoolId>
 <hostId>host-40</hostId>
 <datastoreId>datastore-23</datastoreId>
 <deployType>medium</deployType>
 <networkId>dvportgroup-2815</networkId>
 <password>Longlivevirtual@123</password>
 </controllerSpec>"


try {
        $result = Invoke-WebRequest -Uri $Request -Headers $head -ContentType "application/xml" -Method POST -ErrorAction:Stop -Body $body
}
catch {
       $result = $_.Exception.Response.GetResponseStream()
        $reader = New-Object System.IO.StreamReader($result)
        $responseBody = $reader.ReadToEnd();
 }

 $responseBody
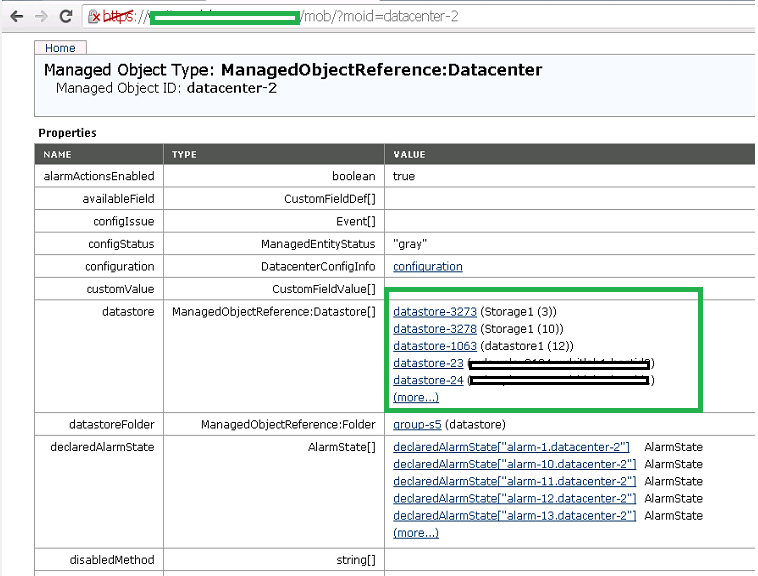
Another thing to note is that the body part needs the exact id of the object, for example if you put the name of the datastore like ‘IO_Intensive’, the request will fail and you need to key in the related datastore ID.
This can be extracted by looking up the Managed Object Reference (MoRef) for the vcenter server objects, similar to the way we extracted the ip pool id.
As you can see below if you want to use “Storage 1 (3)” as the datastore where the controller node needs to be created, you should use the datastore id of “datastore-3273” in the above script block. you can use the similar technique to extract the moref’s for the other vcenter objects too.
Once you execute the above scriptblock, you would see the NSX controller created in your NSX tab in web client.
I hope you enjoyed this blogpost and found the information useful.
Do check out some of my other Posts on NSX


Pingback: VMware NSX PowerShell Installation
Pingback: VMware NSX Host Preparation with PowerShell
Pingback: VMware NSX Logical Switch and DLR config GUI-API
Pingback: Getting Started with PowerNSX - PowerShell Module for NSX