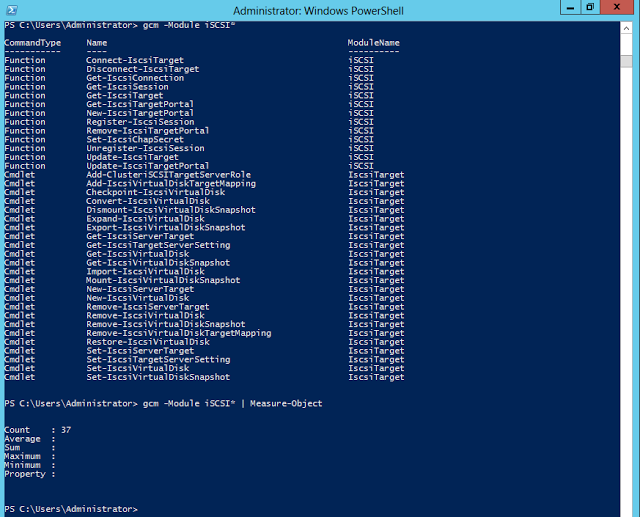
PS C:Windowssystem32> gcm -Module iSCSI*
PS C:Windowssystem32> gcm -Module iSCSI* | Measure-Object

Now i will show you some basic cmdlets which could be used to configure a iSCSITarget on a server.
iSCSI Target Server module is loaded by default in Windows Server 2012. However, the cmdlets cannot be run successfully without the iSCSI Target Server role service installed.
Add-WindowsFeature FS-iSCSTarget-Server
I used http://blogs.technet.com/b/filecab/archive/2012/05/21/introduction-of-iscsi-target-in-windows-server-2012.aspx as a reference to carry out these test scenarios
For creating this labsetup i used free version of “StarWind Software” to convert a server installed with “Windows Server 2008R2 ” to Storage Server (SAN).
It is designed for use with solutions like VMware vSphere, Microsoft Hyper-V and Citrix XenServer. It also supports Microsoft Windows Failover Clustering and a full range of clustered applications e.g. Oracle, Microsoft SQL server, MS Exchange or MS Sharepoint.
Here’s the link for the same. It also contains steps in pdf format on how to create shared storage.
http://www.starwindsoftware.com/starwind-iscsi-san-overview
Now i went ahead and created two new VHD’s as shared storage each of size 2GB and 4GB

Ok so now we are set up with a Storage Server in which we have configured two sets of shared storage each of 2GB and 4GB size which are ready to be accessed by other devices.
Now in order to access the storage on my Windows Server 2012 box, here are some of steps which i followed.
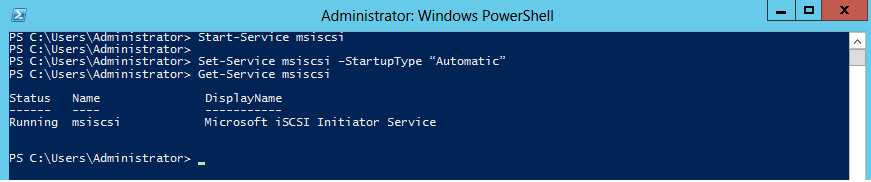
1) Check Status of iSCSI Service – We should make sure that the iSCSI service is in running state and we should set up its startup type to automatic, if its not none of our cmdlets would work to configure storage.
PS C:Windowssystem32> start-service msiscsi
PS C:Windowssystem32> Set-Service msiscsi –StartupType “Automatic”
2) Configure an iSCSI target portal – Next we need to configure an iSCSI target portal by using New-IscsiTargetPortal, so here below im connecting to an iSCSI target portal or in simple english im connecting to my starwind storage server whose IP Address is 10.10.10.75
PS C:Windowssystem32> New-IscsiTargetPortal –TargetPortalAddress 10.10.10.75

Here’s the view in UI.

Now if do a Get-IscsiTarget i can get list of all available targets for that target portal, so as you can see there are two imagefiles which have been created imagefile0 which represents the 2GB storage and imagefile1 which represents 4GB storage.
PS C:Windowssystem32> Get-IscsiTarget | ft -AutoSize -Wrap

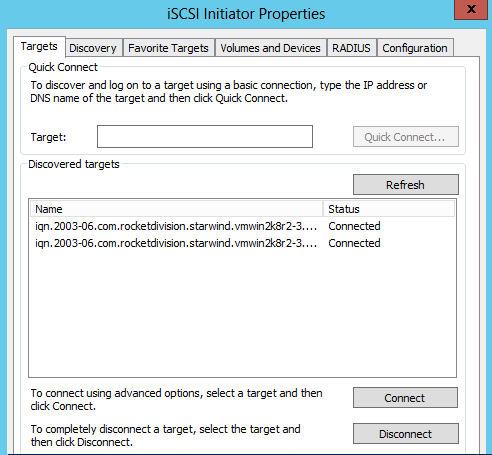
3) Connecting to iSCSITarget – Now i can connect to the either of the iSCSITarget depending on my requirement, or maybe if i have another Windows Server 2012 i can connect one of them to it also. Here in my test scenario im going to connect to all available iSCSITargets. For this i use Connect-IscsiTarget cmdlet
PS C:Windowssystem32> Get-IscsiTarget | Connect-IscsiTarget

If i want i can connect to individual targets specifying a unique node address too.
PS C:Windowssystem32> Connect-IscsiTarget -NodeAddress "iqn.2003-06.com.rocketdivision.starwind.vmwin2k8r2-3.powershell-enthusiast.com.imagefile0"
Here’s the view in UI.
3) Register iSCSITarget as Favourite Target – Next i can register the iSCSITarget as a favorite target so that the targets will re-connect upon initiator machine reboot. for this i can pipe the output of Get-IscsiSession to Register-IscsiSession
PS C:Windowssystem32> Get-IscsiSession | Register-IscsiSession

Here’s the view in UI.

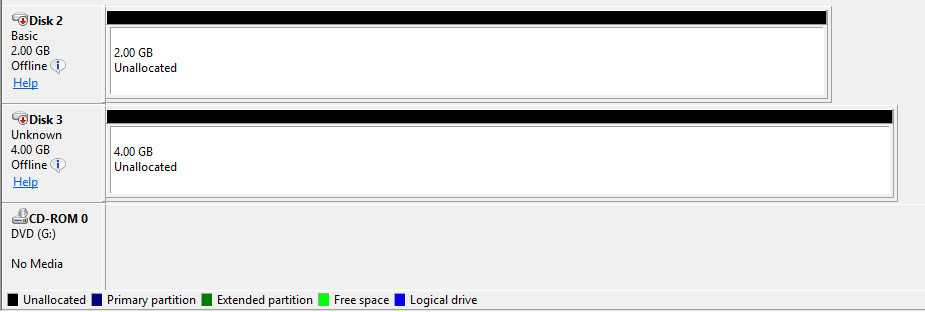
Create new volume – Once the connection is established, the iSCSI virtual disk will be presented to the initiator as a disk. By default, this disk will be offline,then we would create a volume, format the volume and assign with a drive letter so it can be used just like a local hard disk.
PS C:Windowssystem32> Get-Disk
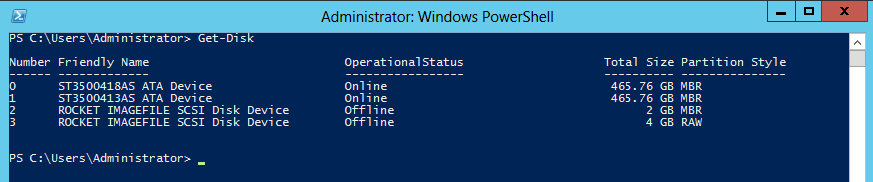
Here’s the view in UI
Now i can bring all the disks online using Set-Disk cmdlet and setting -Isoffline attribute to 0
PS C:Windowssystem32> Get-Disk | ?{$_.operationalstatus -eq "offline"}
PS C:Windowssystem32> Get-Disk | ?{$_.operationalstatus -eq "offline"} | Set-Disk -IsOffline 0
PS C:Windowssystem32> Get-Disk | ?{$_.operationalstatus -eq "online"}

Next i can Make the disks writable using Set-Disk cmdlet and setting -IsReadOnly attribute to 0.
PS C:Windowssystem32> Get-Disk | ?{$_.friendlyname -match "rocket"}
PS C:Windowssystem32> Get-Disk | ?{$_.friendlyname -match "rocket"} | Set-Disk -IsReadOnly 0

Next i can initialize the disk with partition style as MBR using Initialize-Disk cmdlet and setting -PartitionStyle attribute to MBR.
PS C:Windowssystem32> Get-Disk | ?{$_.friendlyname -match "rocket"} | Initialize-Disk -PartitionStyle MBR
PS C:Windowssystem32> Get-Disk | ?{$_.friendlyname -match "rocket"}

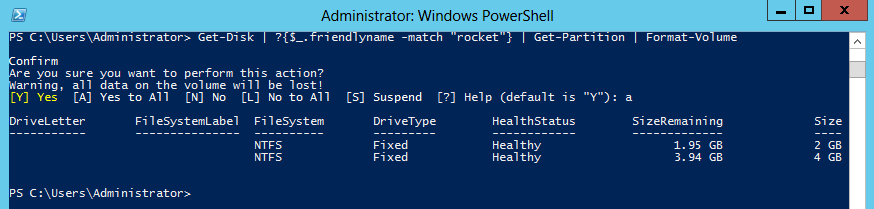
Next i create a partition and format it using Format-Volume cmdlet.
PS C:Windowssystem32> Get-Disk | ?{$_.friendlyname -match "rocket"} | Get-Partition | Format-Volume
Next i will assign a drive letter for both the drives using Add-PartitionAccesspath cmdlet..
PS C:Windowssystem32> Get-Disk | ?{$_.friendlyname -match "rocket"} | Get-Partition | Add-PartitionAccessPath –AssignDriveLetter:$true

Next if i check my diskmgmt console i can see that all target disks have been configured.

Depending on requirement we can combine all these steps into a PowerShell Workflow and make them run in parallel on a set of servers.
Thanx Your post help me to get information & also for fresher who is new in this industy, get knowledge from your blog.
Thanx
Online Medical Transcription
I will try to add tabs to all my transcriptions from now on.24 hour turnaround
Is it possible to create target and add device in starwid using powershell commands?
Pingback: Convert a Windows Server 2012 Server to iSCSI Target Server And Offer Low-Cost Storage -Virtualize & Automate-
Hello
Thank you very much for this website.
It would be very useful if your scripts would just have the commands – it obvious that these lines are script lines.
Good: Get-IscsiTarget | Connect-IscsiTarget
Bad: PS C:Windowssystem32> Get-IscsiTarget | Connect-IscsiTarget
If you just add the commands, then it’s much easier for your readers to use copy / paste 🙂
Thanks a lot, kind regards, Thomas